Hey...
If you read my preview post you'll know I'm doing a big 4 parter all about how and why I made my Cardcaptor Sakura cosplay and to start if all off, today's post will be about making the sealing wand.
If you read my preview post you'll know I'm doing a big 4 parter all about how and why I made my Cardcaptor Sakura cosplay and to start if all off, today's post will be about making the sealing wand.
I originally wanted to buy a sealing wand but when I saw that it was £100+ online I decided to make one, so I made a trip to Hobby Craft and bought supplies and started the planning as soon as I got home.
...And then the crafting began...
I started by obviously gluing a polystyrene egg to a broom handle, I used masking tape to keep in place while it dried. I then stuck half of a smaller egg to it with cocktail sticks and glue.
Once it dried I used some air drying modelling clay to help keep the head and beak in place, as well as to give the beak more shape. I ended up covering the rest of it in clay too, to even out the surface and then left it to dry. When it was dry I sanded it down a little, to smoothen it out before going on to the next stage.
While waiting for things to dry I decided to make the wings for the head.
To do this, I traced around the head piece and drew on the wings the size I wanted and cut it out, placed it on the head to see if it was right, once happy, I traced around the cut out piece, since my foam was thin I did a few to layer it up.
For the pink part of the wings, I cut circles out of the top piece, glue some thing clear plastic to the inside and painted it pink. Then glued it all together. For the back wings, I did a similar process, where I cut it out with paper and held it to the head to make sure I got the sizes and shapes right.
For the pink part of the wings, I cut circles out of the top piece, glue some thing clear plastic to the inside and painted it pink. Then glued it all together. For the back wings, I did a similar process, where I cut it out with paper and held it to the head to make sure I got the sizes and shapes right.
I then got my modelling clay back out and worked on the bottom.
I had to shape it so it was a little thicket at the bottom and once I was happy with that I made the rings and added the little triangles and left it to dry.
When it was dry, I started the fun the part of it all...
The painting.
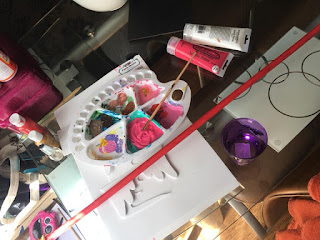
As you can see in this, I painted the stick with a pink, but it turned red, so had to mix a lighter pink and re-paint it. The pink I mixed ended up being what the original colour should have been, so I'm not sure how it ended up turning red.
Now for some reason I don't have pictures of the last part, but I know what I did.
I went over the head piece with some foam, but missed out the beak. I had to use a heat gun to manipulate the foam so it would curve better around the head. This took a few attempts and was a little difficult to do on my own, but once the shape was good I glued it down and added some little tringles at the side of the beak with my clay and waited for it to dry.
When it was dry I painted the foam gold and again, waited for it to dry before adding the finishing touches, aka the wings.
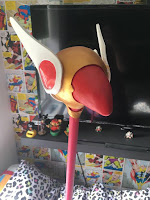
...And here it is, the final product, please comment to tell me what you think and look out for part 2 coming in the next few days.
Thanks for reading xx


No comments:
Post a Comment